Setting Up Jest With React Testing Library to Work With Redux Components
As someone who had recently been learning unit testing with react, I found that there are many complications using ‘enzyme’ in react 17 at the moment. This led me to try and find an other solution. I decided to try and use react testing library along with jest to test components.
In this article I will be taking you through the steps that allowed me to setup jest testing on components while state is being held in a Redux Store.
Step 1
You will need to get your environment setup with the correct dependencies. Run the following commands to install dependencies:
$ npx create-react-app app-name$ cd app-name$ npm install @testing-library/react react-test-renderer jest-dom --save-dev$ yarn add --dev jest-css-modules
Step 2
You will need to setup a few components & a few test files to go along with the components. As you can see in this example below, I have created an app with 3 components & 3 tests. The three orange colored js files are the test files, yellow are the components I will be testing.

It is important to note that the naming convention for test files is <testFileName>.test.js. If you are writing tests for component_A.js, then the test filename would be component_A.test.js. This is how jest recognizes your test files. I also recommend making a folder as I did in my example so all your tests are put together.
Step 3
This is only necessary if you are using Redux, otherwise you can skip ahead to step 4. React testing library’s render function does not recognize your Redux provider in your components, which is why we will need to monkey patch the render function so that it can recognize our state stored in Redux.
First we need to make sure we have our root reducer setup and exported from our reducers folder. (Note: This is not a redux tutorial so if you do not know how to setup your actions & reducers then learn that first & come back to this article to setup testing).
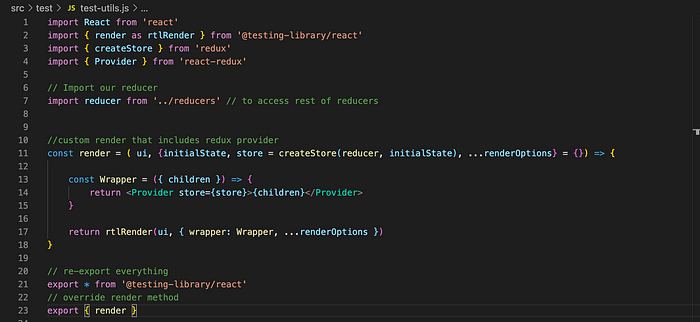
Next create one more file in our test folder called test-utils.js. In this file we will be updating the ‘render’ function from react testing library so it can recognize state from our Redux store. The first thing we need to add to this file is our imports -
import React from 'react'import { render as rtlRender } from '@testing-library/react'import { createStore } from 'redux'import { Provider } from 'react-redux'// Import our reducerimport reducer from '../reducers' // to access rest of reducers
As you can see we need to import render from react testing library, next import createStore from redux, then Provider from react-redux, & lastly import our root reducer from our Redux reducers folder.
Next we will be creating a custom render function in this same test-utils.js file under our imports:
//custom render that includes redux providerconst render = ( ui, {initialState, store = createStore(reducer, initialState), ...renderOptions} = {}) => {const Wrapper = ({ children }) => {return <Provider store={store}>{children}</Provider>}return rtlRender(ui, { wrapper: Wrapper, ...renderOptions })}
Lastly, underneath our custom render function we need to export our new render function as well as all the other functions provided by React testing library:
// re-export everythingexport * from '@testing-library/react'// override render methodexport { render }
The test-utils.js file should look like this -
Step 4
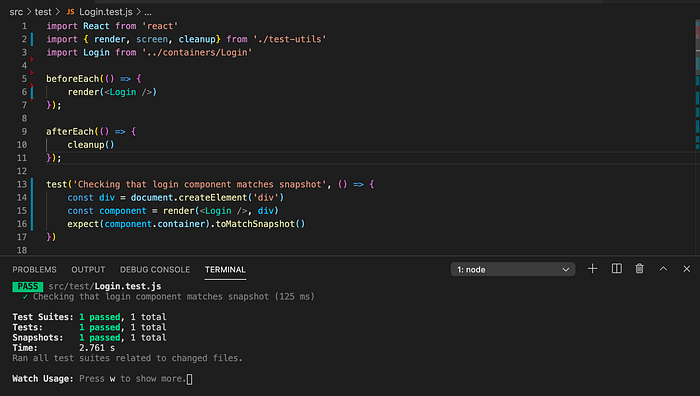
Now it’s time to start testing your components. To start import what you will be using from your test-utils.js -

As you can see I imported render, screen, and cleanup from my test-utils instead of from ‘@testing-library/react’ (Note: if you are not using redux you will be importing from ‘@testing-library/react’). I also imported a Login component that I will be testing. If you are using Redux make sure the component you are testing has at least one state in a redux reducer. This way you can verify everything is working as intended now instead of finding an issue later after implementing a bunch of tests.
Now let’s setup our first test. For my login test I want to render the component before each test & use react testing libraries cleanup function after every test.
If everything is setup properly, you will have setup & passed your first test, congrats!