GraphQL Code Generator with TypeScript and GraphQL
Using GraphQL Code Generator to create a great developer experience with TypeScript and GraphQL

If you’re anything like me, you’ve recently been writing code almost exclusively in TypeScript, and the odd time you do have to open up a .js file fills you with a mild panic. You probably also spend time building REST APIs and GraphQL layers to communicate with front-end applications. At first TypeScript and GraphQL seem like a match made in heaven; they’re both typed, so they should play nicely together.
However, when you have two different type systems, or two sources of truth for how your data should look (before you even include a database), there is inevitably going to be frustration when building features, and bugs when you release those features. This had been my experience until I came across a project where GraphQL Code Generator was magically creating TS types for me whenever I changed my GraphQL schema. I’m not a huge fan of using magic without understanding the underlying tools, so I wanted to recreate a minimal example to do the same thing, and hopefully other people find this useful as well!
In this article we will:
- Create a TypeScript project from scratch
- Add a very simple GraphQL server
- Add GraphQL Code Generator to integrate them both in a seamless manner
If the whole thing is TL;DR, you can find the final code here.
Setting up TypeScript
By the end of this section, your project should look like this.
I’m assuming that if you’re reading this you already have Node, npm, and Yarn installed on your machine, and are vaguely familiar with using them.
To get started, we want to create an empty npm project (the default options are all fine):
mkdir my_project && cd my_project && npm initNext we want to add typescript into the devDependencies of the project. This is because we use TypeScript to transpile our code into Javascript, we don’t need to run it in our production build. While we’re here let’s also add ts-node, and nodemon, we will see how to use them shortly.
yarn add -D typescript ts-node nodemonNow you want to initialise your TypeScript project. This will create a default tsconfig.json file.
npx tsc --initHave a look at the options which aren’t enabled by default. Set "outDir": "dist" and "sourceMap": true . This will send your transpiled code to a dist directory which you should not commit to Git, and enable easier debugging when something goes wrong.
Now we have TS set up, let’s add an index.ts file in the src folder, and add the following code to it. This is a very simple Hello World TS project:
const world = "world";export function hello(word: string): void {
    console.log(`Hello ${word}! `);
}hello(world);
You can now run npx tsc to transpile the code, and node dist/index.js to run it, and you should see the output on your console. While this is doable, it’s annoying to have to do this every time to change your code. Instead, we can transpile and execute our code at the same time, using ts-node. Simply run ts-node src/index.ts and your TS code will be transpiled and executed in one command. It’s important to note this is an optimisation only meant when rapidly iterating and running code on your machine. Any production application should not be executed with ts-node.
We can still do a bit better here. Having to run this command every time we save the file is a bit painful. Instead create a nodemon.json file, and include the following:
{
  "watch": ["src"],
  "ext": "ts",
  "exec": "ts-node ./src/index.ts"
}
This will all files in the src folder with a .ts extension, and execute the ts-node command when one of those files changes.
Now in order to run this nodemon file, lets add an npm script in the package.json file:
"scripts": {
  "start": "nodemon",
}
We can execute this with yarn start and then change the index.ts file and see our changes executed straight away 🚀
Adding a GraphQL server
By the end of this section, your code should look like this.
First, let’s add the dependencies we will use in this section, we will get to these eventually:
yarn add apollo-server graphql @graphql-tools/load @graphql-tools/graphql-file-loader @graphql-tools/schemaNext, let’s add our first TS types in src/types/types.ts :
export interface Todo {
  title: string;
  description: string;
}
And let’s add some data to the index.ts file which uses this type (you can remove all the old code from this file):
import { Todo } from "./types/types";const todos: Todo[] = [
  {
    title: "Walk dog",
    description: "Before 9am",
  },
  {
    title: "Clean bathroom",
    description: "",
  },
];
Now let’s add a GraphQL schema (in src/schemas/index.graphql) which allows us to Query for Todo items:
type Todo {
  title: String
  description: String
}type Query {
  todos: [Todo]
}
Now that we have a new file extension, let’s also update ext section of the nodemon.json file, which will enable our hot reloading whenever a .ts OR .graphql file changes.
"ext": "ts,graphql"Now, we want to use this schema to set up our GraphQL server. To do so, first let’s add all the functions we need from the dependencies we installed earlier to the index.ts file:
import { loadSchemaSync } from "@graphql-tools/load";
import { GraphQLFileLoader } from "@graphql-tools/graphql-file-loader";
import { addResolversToSchema } from "@graphql-tools/schema";
import { ApolloServer } from "apollo-server";
First, let’s load the GraphQL schema we defined earlier using loadSchemaSync and GraphQLFileLoader . These functions let us essentially import all the GraphQL files we have defined, which there is no regular way to do in TypeScript.
const schema = loadSchemaSync("**/*.graphql", {
  loaders: [new GraphQLFileLoader()],
});
Next, let’s define some a resolver to fulfill the schema:
const resolvers = {
  Query: {
    todos: (): Todo[] => todos,
  },
};
This will simply return the todos data we defined earlier.
Finally, we can add the resolvers to the schema using addResolversToSchema:
const schemaWithResolvers = addResolversToSchema({
  schema,
  resolvers,
});
Now, we’re ready to give this schema to our Apollo server (Apollo is a popular GraphQL implementation for Javascript):
const server = new ApolloServer({ schema: schemaWithResolvers });server.listen().then(({ url }) => {
  console.log(`🚀  Server ready at ${url}`);
});
Now, when you save index.ts , you should see the Server ready log in your console. Now open localhost:4000 in a browser, and you can try out the query in the GraphQL playground:
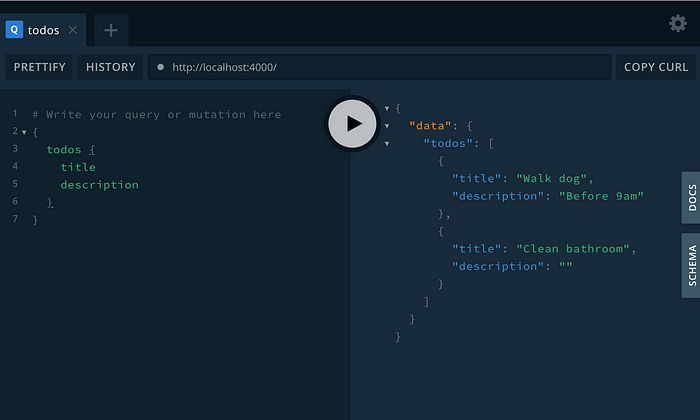
At this point, we have a GraphQL server, hot reloading for our GraphQL and TypeScript files, a GraphQL schema and some TS types, and some data to respond with.
However, there is a fairly obvious problem with this. When our data model inevitably changes, we have to update both the TS types and the GraphQL schema. In this simple example it’s trivial, but at any sort of scale beyond this it will go wrong. It’s also boring and not a good use of an engineers time, which is very valuable! It’s also a very common source of bugs when you release this code.
To fix this, we can take advantage of GraphQL Code Generator.
Adding GraphQL Code Generator
At the end of this section, your code should look like this.
Again, let’s start by adding the dependencies we will make use of:
yarn add @graphql-codegen/cli @graphql-codegen/typescript @graphql-codegen/typescript-resolversAnd also create a codegen.yaml file with the following content:
overwrite: true
schema: src/schemas/**/*.graphql
documents: null
generates:
  src/types/types.d.ts:
    plugins:
      - "typescript"
      - "typescript-resolvers"
This will take all the .graphql files in src/schemas and generate TypeScript types in src/types/types.d.ts .
In order to execute this, let’s add another npm script:
"generate": "graphql-codegen"and run it with yarn generate . Once this is done, you can see your generated file! Now that we have this, we can delete the old file src/types.types.ts .
At this point nothing has really changed, and our code still runs the same. Let’s make sure this generate command runs each time we change code, by updating the exec section in nodemon.json :
"exec": "yarn generate && ts-node ./src/index.ts"Now when you add an id field to the Todo type in index.graphql :
type Todo {
  title: String
  description: String
  id: Int
}
You should see some errors as we don’t have an id field defined in our data…but we don’t?
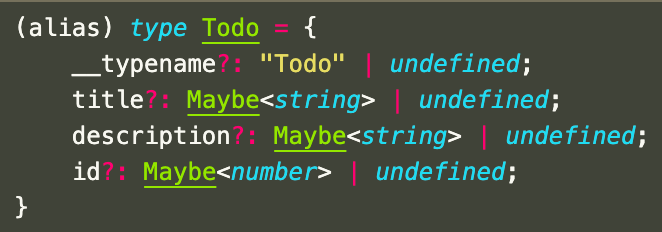
If we look at the Todo type, we can see that all the fields are optional, and will accept undefined. This isn’t what we want, as this data model requires all data to exist all the time, so let’s update the GraphQL schema to reflect that:
type Todo {
  title: String!
  description: String!
  id: Int!
}
Now when we save the file and our server reloads, it crashes and we can see the error clearly in our editor:

We can fix this error by adding ids to the Todos data object, at which point our server will restart and we can now query for iddata. 🎉
Now we’re in a lovely place where our TS types are generated entirely from our GraphQL schema, and every time the schema changes the types are regenerated. This massively simplifies the developer experience and speeds up the feedback loop, catching bugs before our code is even transpiled, let alone tested or deployed.
Taking it further
If you wanted to keep working on this, you could add some GraphQL Mutations which use arguments, and see how the code generator creates types for the arguments as well as the response objects. If you wanted to get really fancy you could also try and integrate this approach with a database type system to achieve complete data model synchronisation 💆♂.