How to Build a Classic Web3 NFT Minting Dapp with React and Solidity

What you will be building, see the live demo and GitHub repo for more info (don’t forget to star the project).


Introduction
In PART ONE of this tutorial, we coded the smart contract part of this application with Solidity, now it’s time we merge it up with React.
If you haven’t checked PART ONE of this tutorial, I recommend that you do that first before continuing with this second part.
If you’re getting value out of this tutorial and you want to go all-in with blockchain development then book a private lesson with me.
Let’s jump in and start coding…
Check out my Youtube channel for FREE web3 tutorials now.
Prerequisites
You must have completed PART ONE of this article in other to fully benefit from this part. If you haven’t, please quickly check PART ONE, blockchain development is no child’s play.
Building the Components
Let’s start with building out the components one step at a time, make sure you follow the steps accurately…
The Header Component
Like always, we’ll start with the header component, this is the normal flow of any website or application.

This was beautifully crafted with tailwind CSS using the gradients styling. It simply enables a user to connect a wallet address for minting. In the project, go to your components folder and create a new file called Header.jsx. Afterward, paste the codes below inside of it.
That will be it for the header, let’s work on the Hero component.
The Hero Component

This component is responsible for initiating the minting process as you can see with the mint button. Also, it takes a record of the total number of NFTs minted against the ones remaining.
Here is the code snippet responsible for this operation…
Next on our list is the artworks component…
The Artworks Component

This component is saddled with the responsibility of rendering the artworks one after the other. The tailwind CSS came through here for helping us design a stunning interface.
Let’s take a look at the codes responsible for these components’ behavior…
Let’s move on to adding the Footer component…
The Footer Component

If you appreciate good work, you will love this design. Tailwind CSS has enabled me to build beautiful components such as this. Hey, if you are interested, I could take you on a private teaching session on blockchain development, kindly see my offers here.
Coming back to this build, this current component lightly features a signature display of site brand and logo, nothing much to this component, however, I needed to include it in this tutorial.
Below is the code for it…
Fantastic, we are almost done with these components, let’s add up the last two…
The Alert Component
This component, as intuitive as it sounds is responsible for notifying us when our minting process is done. Again, it was handcrafted by the use of Tailwind CSS and some React Icons.
Let’s take a look at the codes exhibiting its behavior…
Nice, let’s complete these components by adding the Loader component into the mix.
The Loader Component

This component simply displays a spinner that also shows the current progress of the NFT as it is being minted.
The state management library react-global-hooks manages the activities that occur under the hood here; more on this later.
Here is the code for this component…
Awesome, now that we’re done with coding the components, let’s dive into App.jsx and couple them together.
The App Component
This component is responsible for connecting all other components to be used in this project, let’s look at how it is coded.
We are not quite done yet, let’s include other essential configurations.
The Index Files
Please make sure that your index.jsx and index.css are having the configurations as seen in the code snippet below.
Fantastic, are there two more important files you must be aware of, let’s look at them…
The Adulam Blockchain Interface
For you to interact with our deployed smart contract, you need to access it via functions. The codes below enable us to interact with our smart contract which is now running on a live blockchain network. Create a file named Adulam.jsx in the src folder of this project and paste the following codes into it.
This is such a handy function structure that you should consider using in your subsequent blockchain project. It keeps all the blockchain-related functions together and helps us keep our sanity.
Next, let’s discuss how our little but not so little state management library is coordinating these entire activities behind the scene.
The Statement Management Library
We’re using the react-global-hook package for our state management. Setting up redux for a small project like this can be cumbersome, and why should you when you have an implementation so simple as the one below?
Create a folder inside the src directory called the store and also create a file named index.jsx within it, now paste the codes below in the file and save.
We are almost done here…
The ABIs folder and files

Let me direct your attention to this folder which should not be empty by now…
During PART ONE of this article, we specified in truffle-config.js to create these files in this folder whenever we compile a smart contract, that’s why we’re having that folder available to us.
The Assets Files

I must say that we’re just about done, except that we haven’t included the assets folder and files. Let’s quickly do that…
Create a folder in the src directory called assets, next, download and move the file below inside of it.
Use this link to the git repo to download the images.
Now that we are done with all the builds, let’s start up the server to go live by running the command below on the terminal to do this!
yarn start #starts the server on localhost:3000
Congratulations, you are officially done with this build…
Watch my FREE web3 tutorials on Youtube now.
Conclusion
You have seen another classic example of how to build a web3 application. I firmly believe that if you’ve been coding along with me, you are one of the blockchain armies the decentralized internet is looking for.
I’m currently teaching blockchain development online, if you want to go deeper with this skill, book a private class with me now.
Till next time, all the best!
About the Author
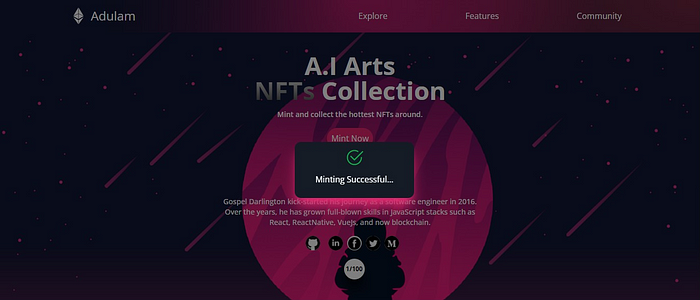
Gospel Darlington kick-started his journey as a software engineer in 2016. Over the years, he has grown full-blown skills in JavaScript stacks such as React, React Native, Vue.js, and now blockchain.
He is currently freelancing, building apps for clients, and writing technical tutorials teaching others how to do what he does.
Gospel Darlington is open and available to hear from you. You can reach him on LinkedIn, Facebook, Github, or on his website.
More content at PlainEnglish.io. Sign up for our free weekly newsletter. Follow us on Twitter and LinkedIn. Join our community Discord.